Showing posts with label other crafts. Show all posts

Tuesday, 22 October 2019

Acrylic pouring card

Hello Crafters, 

today I have a very different card for you. 

I have been fascinated by the acrylic pouring technique for quite a while now, but it's such a mess, I never dared to try it myself. I can just imagine my cats spreading the colour all over the house. 

Then I found out that one of my colleagues actually does that a lot with his daughter. Mostly on smaller canvases, but eventually with the aim to create some nice big ones for their home. Seeing all of their lovely works hooked me even more, but I am still not happy with how messy that gets. 

And I really don't want to hang so many big canvases either. So I thought of a way to get it out of my system in a card sized way. 

Since paper would warp too much with all the fluids, I got myself very thin (2 mm I think) pieces of balsa wood. It's so lightweight and thin that you can cut it with a craft knife.

Here is my first attempt still in progress.


As you can see, the thin wood warped quite a bit, but it flattened out when it dried. For good cells you need silicone and I didn't have any, but I am still rather happy how it turned out. I adhered the finished piece on a black card base and a added a die cut sentiment. I was fiddling around a lot trying to decide between a black and white sentiment, and in the end I offset the white on on top of the black one to create a shadow effect.


It's a bit bulky, so probably requires extra postage, but I hand delivered mine so it didn't matter. And I totally think the extra postage would be worth it.

Sadly I haven't managed to create any more panels since the first one, but it's firmly on my to-do list. Especially since I now do have some silicone and I still have lots of wood left. 

And also, I bought a big canvas for a "family pour". If it turns out well, it's meant to cover up the large and ugly heater in the hallway.

Let be know if you have ever tried that technique, I am happy for any tip I can get.

Hugs 
Ela


Challenges:
Seize the Birthday: Anything goes Birthday
The Paper Players: #464 Say it Loud
CAS on Froday: #166 Big Sentiment or Word
Day of the month Card Club: #8 World Cardmaking Day 


Monday, 30 September 2019

Stencilled stamp storage and card

Hello fellow Crafters, 

how have you been?

As you know I have moved house and am still trying to unpack the last boxes of nic nacs, which is my declared goal for this week, while I am on holiday.

Also in line with the move, I am trying to re-organise a few things in my new craft room. The new room is very different from my old craft corner in the living room, which is why a lot of the old shelves ended up somewhere else in the house. So I have to find new storage solutions. 

I found these adorable boxes the other day at a dollar store. I loved the design so much, I absolutely wanted to use it in my craft room, especially since the colours really pop against the complimentary wall colour.

First I thought of stamp storage, because I really didn't like my old containers anymore, but the shape is not very well suited for that.


Now I am using one of them for my embossing folders, which just fit in. Remind me not to buy any more embossing folders.
The others is currently still occupied with random stuff, but I will find a good use for them eventually. There is still a lot to re-organise.

That left me still with the problem of my ugly stamp containers and I spent a few weeks looking for a solution. In the end, I took my inspiration from these boxes and got some very cheap Ikea Tjena boxes and customised by sponging on ink through a stencil. Here is the finished result. 


I now keep my stamps and dies in these four boxes and they exactly fit the shelf. I am also planning to stock up on these boxes, in case I have to enhance my storage and also to replace the ones on the shelf below. I am still figuring out how I want them labelled, now that the boxes are so pretty, the label maker is no longer good enough.

Inspired by the success of my ink blending, I created a card to go with it. To keep the focus on the ink blending, I just added a simple die cut shaker element. I love how it turned out. I think I might make a set of it in different colours.


I actually blended a few more card panels that day and will hopefully make them all into cards eventually.


Have a lovely day
Ela


Challenges:
Simon says Stamp: Anything goes
Seize the Birthday: #175 Add a Geometric Shape
The Paper Players: #461 Tic tac Toe (Birthday - Die Cut - CAS)


Wednesday, 3 February 2016

The great book of elves

Hi again,

Time to show you something else that kept me busy during the past weeks.
After seeing my Halloween grimoires, my friend, who is a teacher, asked me to help her create a magic fairy book, as a prop for a school musical. So I spent quite a few busy evenings, collecting ideas and developing a plan. And then many more actually creating it.

And here it is, the great book of elves:


As a basis I got an old used book, the largest I could find. Then I cut the oval in the front and about a third of the pages, to create the recess for my little fairy. If you ever try to re-create something similar, I can only advise you to use straight lines, the oval was so tough and it didn’t get as even as I had hoped…
After the cutting was finished, I covered the book with mod podge and a single layer of crumpled paper towel, to create some structure. Then I added some more structure with embossing paste and a floral stencil. I had to do that twice, the first layer wasn’t quite enough. I also adhered the die cut fun foam letters to the book.


Then I painted it all white (several layers) and brushed on green and pink, because that was the colour scheme my friend wanted. But that really didn’t look good at all, so I painted it white again. After this layer of white, the green and pink still shone through a little, but I thought that looked rather interesting, almost pearlescent. So I kept it like that and brushed on gold to bring out the structure. But that wasn't quite strong enough for the letters. Therefore I used a gold Edding to trace the letters, corners and stripes. That made them stand out much better.

I placed a green water colour background behind the window and glued the pages of the window together (mod podge again). Then I adhered some leaves, flowers, a small piece of bark and the fairy in the opening.


I also added three strings of pearls to the outside spine, to make it more magical. To do so, I fixed the strings to an elastic band with wire, pulled the elastic through the spine and then fixed the other side in the same way, under a bit of tension. Now the elastic is pulling in the string and wire, keeping them safely hidden.


After the outside was completed, I turned to the inside. As the base was a glossy paged cookery book, I really wanted to cover the pages with something.
So for a start I removed quite a few pages, to make the book less heavy, thinking of the poor child who will have to hold it up on stage. Then I chose aged looking printer paper and printed a few fairy stories on it in a font I liked, but very lightly so the print was barely visible. Then I traced all the letters with a black calligraphy fountain pen, to make it look handwritten. Next time I’d definitely just print it in black and be done with it. I don't even want to know how many hours that cost me.

Next step was to cut off all the remaining pages, leaving only a narrow strip of each, on which I adhered the new pages, covering the strip from both sides. That was much more difficult than I thought, which is why the pages don’t look as neatly as I had hoped. But after all the work I just can’t start over… So that’s deliberate, definitely…. ;) 


By now, my friend already took the book back to school to show her class, and they were all excited...

Now, have a magical day
Ela

Tuesday, 26 January 2016

Harry Potter Halloween Party

Hi Crafters,

maybe you still remember, that I promised to show my Harry Potter Halloween party decorations, as soon as my friend would send me the pictures she took. Well, I still don't have them, she's always very busy, so I decided to go ahead with the ones I took. I did not take pictures of everything, because I had planned to take them when it was all finished, but food preparations took so much longer, that the "all finished status" was reached about one hour into the party... So no time to take pictures. 

But I checked my mobile and my camera for what I had and here it is.... Sorry that some of the photos are of rather bad quality, they were never meant to go online.

First things first: the invitation card and envelope. I embossed a grey panel with a spider's web embossing folder went over the raised parts and edges with white pigment ink. Then I matted it with a lilac panel and adhered it to an orange card base. Next, I created the sentiment strip, which I adhered with foam tape. 
By the way, I didn't have lilac cards stock, so I used white and coloured it with an alcohol marker. 

The spider is a cheap plastic Halloween prop, adhered with hot glue. It's rather bulky, but none of the cards went in the mail, so who cares. 

For the envelopes I just doodled a spider on a string and a few webs. The cards were all the same, but each of the envelopes was a little different. 


Normally, our house is not open to the street, the entrance is behind a high gate, so no one can look into the garden. But for the occasion we opened the gate and decorated the cobbled front area near the entrance. There is a second, very old gate a few meters further back, which we closed instead, so the garden was still closed off.  

We carved a pumpkin, set up three store bought gravestones and lighted a few red grave yard candles around them. Although that doesn't sound all that special, it looked pretty cool. 


Inside we decorated quite a bit more. Most of the things are handmade, or altered somehow and most ideas are from the internet.

First off, a flock of hand cut cardstock bats. They cost me several evenings, but were totally worth it. 


When I found the printable Harry Potter labels  on the Internet, I instantly decided, that I need a devil's workshop. So I collected all kinds of small bottles for a while and tried to make the best of them. The ones that didn't let go of their labels easily, I painted black.


This one is hard to see, because I had to take the picture against the sun. I used heaps if small plastic spiders (the same ones I had on the invitations) and sewed them to my kitchen curtain. I also stuck some on the wall and the window pane, so it would look like they were crawling from all directions (actually only three directions) towards a little cracked hole in the window. The crack I sketched on with a white-out marker. 


My mother in law had some old white candles that had lost their form a bit over time. I made good use of them, by dribbling on red wax from another old candle around the top and letting it run down. I put them up all over the house, but unfortunately I didn't take a picture of them in place. This picture I took when I created them, to show my friend how creepy they turned out. 


For the Halloween sweets I used mason jars in different sizes. and printed out some Harry Potter sweets labels, which I didn't adhere to the jars, because I wanted to re-use them for something else. Instead I folded the labels like a place card and placed them next to each jar. 

The star among these were definitely the eye balls. I personally think they are totally disgusting, they are wobbly and look way to real for my taste. But the kids all love them. We get them for every Birthday, no matter what the motto is. 

In the jar on the second photo are jelly beans, ahem, every flavor beans. On the last picture, there are spider-lollipops, created with a lollipop, googly eyes and black pipe cleaners. 


This is one of the soap dispensers I prepared. I removed the label and somehow managed to get the plastic skeleton through the opening. That was a pretty tight fit, and it helped a lot that it was a rubbery, bendy plastic. I prepared a second dispenser with rubbery cockroaches, which creeped me out myself, every time I went into the bathroom. I really regret not having a picture to show you. 


Unfortunately there are some more pictures missing. We hung artificial spider's webs in all kinds of places, especially in the bathroom were the wall is kind of catchy and keeps the webs in place perfectly.
A  white towel with bloody hand marks was hung over the bath tub as if it belonged there. We also hung up a few Halloween lanterns and garlands and used heaps of old jam jar mummy lights to light the place. I didn't want to burn the tall bloody candles, but in the glass jars I decided open fire was safe enough.  

Last but not least of my party decorations, I spent weeks (a lot of drying time) creating spell books for the event. I found this idea, like so many, on the internet. I used old hardcover books, glued on plastic toys and some additional details, like the spider's web (hot glue), the corners and stipes (self-adhering magnetic tape, just because it was lying on my desk and had a straight edge) and the die cut letters (fun foam) for the titles.

When all the glue had dried, I covered the books with mod podge and a single layer of paper towel, making sure there were a lot of nice creases and wrinkles, but at the same time as much detail as possible on the plastic toys and letters.

After this was dry, I painted the books with acrylic paints (black and dark brown) and after yet more drying time I brushed on either gold or silver acrylic paint, to enhance all the details.

These are only some of the books I created, again I don't have pictures of all of them.
Later on I created even more books as Christmas gifts for my girls and their Dad. For those I used cheap empty note books and adhered the names instead of grimoire titles.
   

Right from the start I also had the idea to create "the Monster book of Monsters" from Harry Potter, but didn't have a good idea. Until one day inspiration sparked. I decided to cover the largest of my books with fur and glue vampire's teeth to the edges, like in the movie. I found the perfect greyish black werewolf fur in a shop and the perfect yellowed teeth in the super market. Then I wrote the label with a silver pearl maker pen and fixed it to the fur with some brads that look like screws. The teeth I had to trim a bit, so they would fit better on the straight edge and adhered them with hot glue directly to the book. There is a slit in the fur there.

What you can't see in the picture: I used a shortened old belt to tie it shut. We wouldn't want our guests to get bitten, would we? 


Of course, no party could end without treat bags for the guest to take away. We filled rubber gloves with sweets and  adorned each with a plastic spider ring, that was in one of the deco packs we bought.
As you can see, Nala, the cat, was very interested - she's always were the fun is...


And at the very end: here is it all, nearly packed up. Party in a box for next year. Only 279 days to go.


Creepy Halloween greetings
Ela

Saturday, 14 November 2015

Challenge up your life: Challenge #28 White & Gold

Hello Crafters,
guess what, it's Challenge time again. This week's theme is: 


Challenge #28 White & Gold


over at


I have a different project for you today, no card, but a book.


I die cut the letters and stars from fun foam and adhered them to a cheap notebook from the Dollar store. Then I covered the front and back with one layer of a paper towel and lots and lots of Mod Podge. I made sure to create some nice wrinkles in the paper.

Then I painted the finished cover with acrylic paint and as a very last step I lightly brushed on some gold acrylic paint.

To hide the mess I made on the inside of the cover, I simply adhered a piece of scrapbook paper. 


I created three notebooks this way, to give away for Christmas. The others are in colour, so they don't match the challenge, but I'll show them anyway, just to make the set complete.


And the Insides

 Now I'm looking forward to your creations in Christmasy elegant white and gold!

Have fun
Ela

Saturday, 6 September 2014

It's a Ninja week

Hey Crafters,

today was the big Ninja party, so I want to show you the last few pieces I created for it.

I completed my little bookmarks by laminating them and adding a little bast to the top.


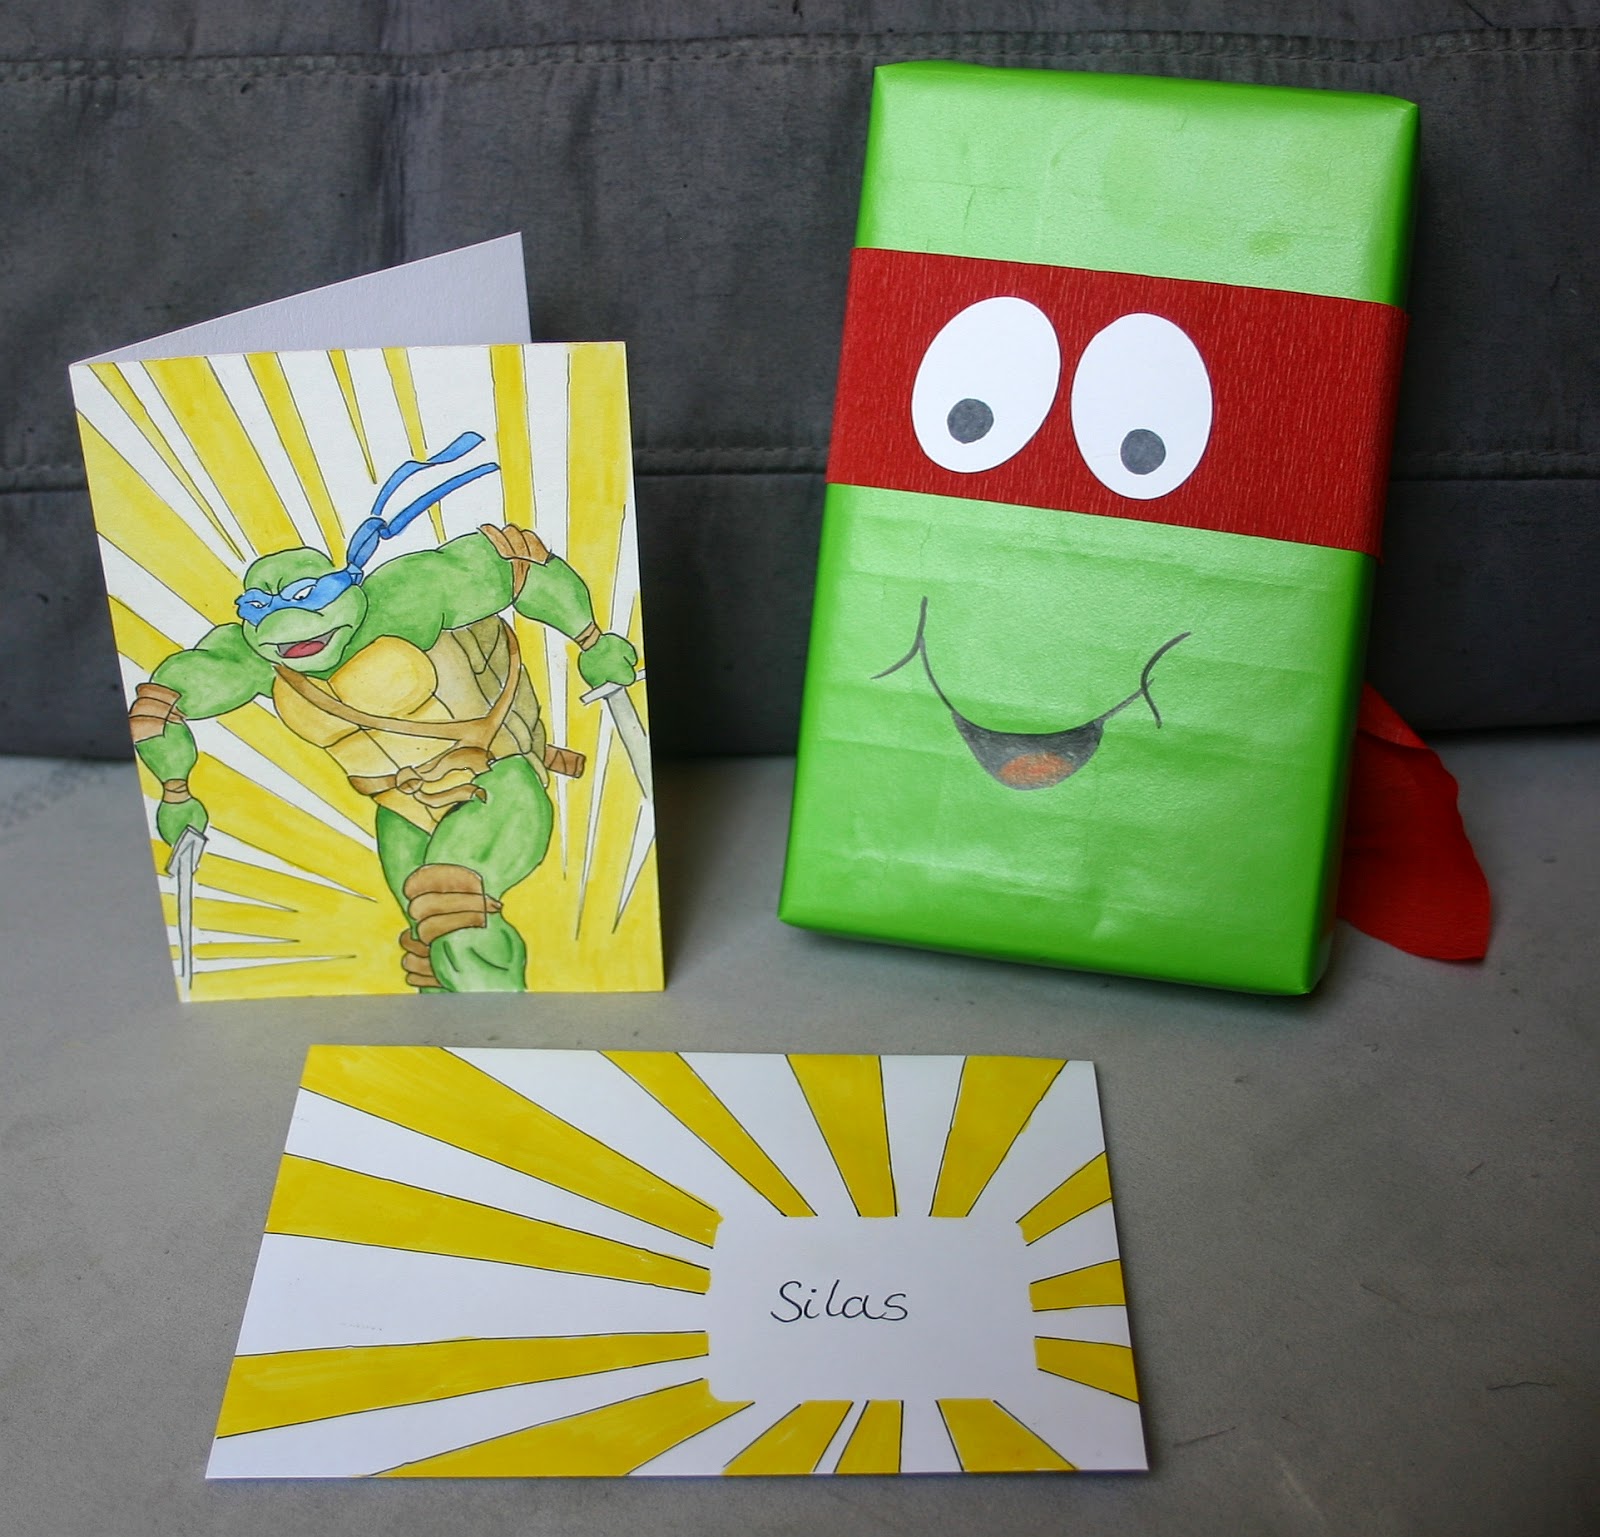
I also created a card, with a print from the Internet that I watercolored with my inktense pencils. I am very pleased with my coloring this time. I drew the same rays on the envelop with a copic liner and colored them with waterbased markers.

Then I wrapped the gift with green wrapping paper drew the mouth and stuck on crepe paper and eyes for the mask.


Have good week-end
Ela

Thursday, 4 September 2014

Ninja Turtles Birthday Party

Hello Everyone,

a few days ago I shared these Ninja Turtle goodie bags, that I created to help a friend with her birthday preparations.

I met that friend yesterday, and she's totally stressed out, so I offered her more help and created  and created bookmarks and a cup game in the same style. 

The bookmarks are not yet done completely, I still need to laminate them and add some ribbon or something to the top. But I don't own a laminator and have to borrow one first. But here they are almost ready. I didn't use cardstock for the masks and eyes, because last time I laminated bookmarks, the cardstock made them a little too bulky. So I used thin colored paper. Unfortunately I had run out of blue and purple, so there are only red and orange turtles. But as these go in the goodie bags, that  won't matter... 


I don't really like the color of the green cardstock, but it's the only one they had in the shop.


For the cups I used the same cardstock to cover the cups. Then I used crepe paper for the masks and added googly eyes and a mouth. In the end I tied little balls on a string and poked the string through the bottom.


Now the only thing that's left to create is the Birthday card. Ah well, and laminate the bookmarks of course.


Love
Ela

Tuesday, 2 September 2014

Ninja Birthday

Hey Crafters,

this week-end, my daughter's first love has his 8th birthday and celebrating a Ninja Turtle party.

I offered his Mom some help and created the goodie bags:


I stuck to what I knew, changing my old concept (I created this before as aliens and angry birds) up a bit. I used crepe paper for the masks. They are glued to the front and knotted on the back. The nouthes are drawn on with edding markers. 

I am not entirely happy, I think it doesn't look enough like turles, but I don't have an idea how to improve them. 
 
By the way, the bear was made a ninja too by my kids.


As I just realized, when I tried to link them: I never posted my alien goodie bags, so here they are:


Have a great day
Ela

Wednesday, 13 August 2014

Matchbox Mania

Hey Crafters,

did you know, that matchbox cars were invented by a father who's daughter's school only allowed children to bring toys that could fit inside a matchbox? I like this story, sounds like a pretty cool Dad.

Why am I talking about matchboxes today? It's because I received my order for 50 crafting matchboxes and dived right in. I ordered these, to create a storage system for my Euro store sequins. 4 sets of each 8 different colors in the same color family. That should pretty much cover all I'll ever need.

But they came in a flimsy plastic packaging, so I wanted a proper storage solution. First I thought about a screw storage box from the hardware store. But those are usually rather larger than I would want them for sequins, so I went for matchboxes as a cheap solution.

So I happily spend an hours or so decoration matchboxes with Washi tape and glueing them together. Then I spent half the afternoon way less happily glueing one sequin to each little drawer and sorting the darn things in their new matchboxes. I may well have developed a deep and lasting dislike for sequins today
.

But even though I might never use them again, at least now I have them sorted. And I used Washi tape! And best of all: I'm done with it!

 
Wishing you a crafty day with something less tedious
Ela

Tuesday, 12 August 2014

Angry birds cans

Hello Crafters,

today I have nothing new to show you, but I can still reach back and show you the angry birds can knockdown game I created for my daughters' birthday party in June.


My mother-in-law collected old Cappuccino cans for months several years ago, for an earlier birthday. And this year I finally painted them with acrylic paint, sticking to this year's theme: Angry birds.

I also used some Ranger Archival black ink, to create some shadows around the noses, but you can't see that in the picture. It was taken with my cell phone, so the quality is not so hot. My favorite cans are the redheads, especially the one with the black eye.


Love
Ela