Thursday 31 October 2019

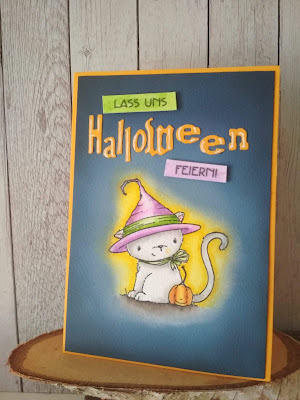
Halloween invitations

Hi Halloween Fans,

are you already looking forward to to tonight? Or dreading it?

I admit, I am a secret fan. Officially of course, I celebrate it only for the children's sake, especially since it is not traditionally celebrated in Germany, where I live. 
However, the spooky decorations are right up my sleeve. 

The past years, we have always made a party with friends, but last year we were already preparing for our move in December, so we had to skip that year. My girls were very reasonable about it, but I had to promise them, we would have a party again this year.

However, the younger of my girls enjoyed last years alternative plan (trick or treating with their little cousin) so much, she wanted to do that again this year, while my older one insisted on the promised party.
They both insisted on their point of view, not even an attempt at a compromise.

In the end, we decided to cut back on the creepy decorations and make a party with the little ones (two cousins and a half brother). Since they are still very young, they will not stay late and we will still have time to watch a film together.

That finally decided with little more than a week to go, I had to create some last minute invitations, to make it a proper party. 


I coloured both images with ZIG markers, sticking to a Halloween colour scheme. For the unicorn, I created the glow with yellow ink blending, but I was not entirely happy with the result, so I tried yellow water colour on the second image.


Did you notice I missed a leaf on the pumpkin? I didn't my daughter pointed it out to me, so I fixed that later. I also added some silver accents on the horn with a gel pen.


For a dramatic vignette, I added Distress Oxides around the whole panel, darkening the very edges with black. 

Then I die cut the letters and stamped the sentiment, which reads "Let's celebrate Halloween".

The effect is not entirely how I imagined, but I am still okay with it. 


Have a lovely day
Ela

Challenges:
Always Fun Challenges: #134 Halloween
Shopping our stash: #407 Halloween
TCP Tuesday: #362 Fall 


Tuesday 29 October 2019

Film strip Birthday card

Hi Crafters, 

how is life treating you? 

Today I'd like to show you another of the stencilled card panels I created a while ago. I have three sets of 15x15 cm stencils from a cheap dutch chain store nearby. One of them inspired me to create my new stamp storage boxes and I wanted to try out a few more of the designs.

One of them has these lines of arrows. I masked off three of them and blended a strip across my card. That looked a bit empty, so I added 2 more lines in green in between. I had originally intended to use a circle and an image on top of that strip. But since I messed up the blending on the centre line of arrows, I needed to cover that up.


To do so, I picked this film strip die and stamped the smallest critter stamps I could find on the individual windows. Since the images are so small, Polychromos pencils seemed to be the easiest option for some very simple colouring.

Then I adhered the film strip and the panel itself with foam adhesive to a white card base. In hindsight, I think I would have preferred the filmstrip flat. 

My girls immediately claimed the card for one of their friends, who's birthday is coming up. I however am not entirely content with it. I think I'll try the same idea and change it up a bit sometime.


Have a beautiful day
Ela


Challenges:

Seize the Birthday: Anything goes Birthday


Sunday 27 October 2019

A sentiment tree

Hello Crafters, 

I do hope you are all well. 

I have another Christmas card for you today. I created it with the same sentiment tree I used for my last Christmas card. I actually made these cards in parallel.


This time I wanted to do a galaxy kind of background, but in the end I covered up all the colours I put underneath. So it's just an uneven watercolour background with gold embossing. Since the embossing was not very prominent, I lightened the centre area with white pigment ink and darkened the edges with black soot distress ink to create the vignette. 

To tie in the gold embossing I added the same embossing powder to the edges of the card base. 
Unfortunately the sentiment is still not very legible, but at least a bit better. 

Lots of love
Ela


Challenges:
CAS(E) this Sketch: #345 


Saturday 26 October 2019

Another Butterfly card

Hello Crafters,

today it's my daughter's turn again. She was inspired by the water coloured butterfly I created a while ago and wanted to use the same stamp.  But then she liked this smaller butterfly better.

 
She used alcohol markers to colour it in shades of lavender and purple. I love the blending she achieved. She picked a grey card base and a white panel and embossed the panel with a 3D embossing folder. Then she added a sentiment die cut, which she also coloured with a lavender gradient. 

I love it, when my girls are creative with me, it's always a relaxed time between us, which isn't always the case. 13 being the age, when parents start to get (even more) strange and embarrassing... 


Wishing you all a nice day
Ela


Challemges:
AAA Cards: #152 Maxi white space +geometric


Friday 25 October 2019

Murphy's wreath

Hello Crafters, 

I hope you are all well. I had a nice surprise yesterday, to cheer me up. My Llama card made it in the top three over at Cardz 4 Guyz. Thanks you so much!


Today's card on the other hand, is a bit of a catastrophe, I am still not sure I'd really like to show it. 

I loved how my wreath turned out the other day, so I wanted to use the same stamp again, but create a different card.


I decided to heat emboss it on a piece of vellum and colour it from the back with my alcohol markers. That turned out very muted which I had expected, but still didn't like. So I added more colour from the front, taking care not to touch the embossing too much. That was much better, but got lost a bit on the striped background I had created with my metallic water colours. 
  So, I dared to double up the vellum. Since I didn't want the adhesive to show, I covered the complete area with liquid glue, believing the markers already dry. Well, they were not, if you look closely you can see quite a bit of bleeding around the image. 

That's when I was ready to trash it, but my youngest insisted for me to continue and decide that the bleeding was deliberate... 

So I cut out the wreath, leaving a border and adhered it to my silver striped card base with tiny pieces of foam squares - that's the upside, the double vellum and colour completely hides the adhesive.


Wanting to dress up the matching envelope, I added the same stripes to the flap and framed the address area. But I really didn't like how that looked, so I also added a few whimsical flowers, which I thought matched the wreath in style and coloured them with ZIG markers - not alcohol this time.

I still think this card is not right, maybe I should have added a black edge (tried that, looked like a sympathy card)? Or doodled stitching? Or trashed it after all? But since it's finished now, I'll keep it. Maybe inspiration strikes in a week or two... 
Any suggestions are welcome.


Hugs
Ela


Challenges: 
Just Add Ink: #480 Just add a technique (heat embossing on vellum)


Thursday 24 October 2019

Jurassic 3rd Birthday card

Hey Crafters, 

I hope you have been doing better than me. My daughter brought home a bug. She suffered from 1,5 days of throat ache, I was down with a fever for the past two days. I am totally doing this wrong. 

Anyway, even sick, you always get to the point when you can't stand lying down anymore, because the neck starts to ache. So I dragged myself to my craft desk. 

My girls' little half brother turned 3 on Tuesday and the party is a family brunch on Sunday, so I still needed a card. Why is it, that I NEVER have cards at hand when I need them? Especially for the smaller children in the family? I have all those dates in my calendar, how can that be so hard to be prepared?

Remembering my cute Dollar store stickers, I decided to go with them again. By now, there are 5 small children in the family, but only two boys and there are still lots of stickers to go.


I picked a Dino and coloured him in with my alcohol markers. The process was rather painful, the markers kept bleeding in places, because this is not really suitable paper. Also my lightest YG is almost empty, I must remember to buy a refill soon. Thinking the image looked a bit flat, I added the deep shadow on the snout. A step I regretted instantly, I had a very hard time blending that out.


In the end, I had to walk away for a few hours, now I think it's fine. Due to all the colour bleeding I fuzzy cut the image out and adhered them to a white card base, that I had prepared with very minimal ink blending.


For the sentiment I wanted to create a huge speech bubble. I know there are dies out there, but I don't own any of them and since you can't have everything, I just made my own. Then I blended on Distress Oxides in the same colour as the blue accents and heat embossed the sentiment. The number is die cut from white card stock and coloured with the same alcohol marker. 

To tie it all in, I added a green envelope with a blue Dino sticker. 

I am very glad it all turned out so well and I love the final result. 

Lots of love and keep healthy
Ela


Challenges:

Seize the Birthday: Anything goes Birthday
Addicted to Stamps and More: #364 CAS
 

Wednesday 23 October 2019

A very small Christmas card

Hello Crafters, 

I hope you are doing fine. 

I currently seem to be back in mojo, I've been making a lot more cards lately than usual. And I think I also know why. I believe it is, because it's been a bit more relaxed at my job for the past few weeks. We've had tough years in my department, and lately we have finally got new staff. We are still in the process of training, but already it's big relief. 

So, I've finally started making Christmas cards, since the holidays are fast approaching.


I love this sentiment tree and wanted to emboss it in either white or silver, so I created a dark blue gradient with my water colours, on which it could shine. I love how that turned out.

But then Murphy's law hit and everything went wrong. This cards is a very usual size, since I had to crop it down several times. First I cut the partial circle too high up, so I needed to shorten the card base. Then I thought it would look better a bit slimmer, so I did that, but I must move the card while cutting, the cut ended up incredibly crooked. So I tried to fix that. In the end it's almost half the size of a normal card, only a bit taller.

But I think I'll use it like a gift tag, so it'll be fine.

Have a lovely day
Ela


Challenges:
Addicted to Stanps and More: #364 CAS


Tuesday 22 October 2019

Acrylic pouring card

Hello Crafters, 

today I have a very different card for you. 

I have been fascinated by the acrylic pouring technique for quite a while now, but it's such a mess, I never dared to try it myself. I can just imagine my cats spreading the colour all over the house. 

Then I found out that one of my colleagues actually does that a lot with his daughter. Mostly on smaller canvases, but eventually with the aim to create some nice big ones for their home. Seeing all of their lovely works hooked me even more, but I am still not happy with how messy that gets. 

And I really don't want to hang so many big canvases either. So I thought of a way to get it out of my system in a card sized way. 

Since paper would warp too much with all the fluids, I got myself very thin (2 mm I think) pieces of balsa wood. It's so lightweight and thin that you can cut it with a craft knife.

Here is my first attempt still in progress.


As you can see, the thin wood warped quite a bit, but it flattened out when it dried. For good cells you need silicone and I didn't have any, but I am still rather happy how it turned out. I adhered the finished piece on a black card base and a added a die cut sentiment. I was fiddling around a lot trying to decide between a black and white sentiment, and in the end I offset the white on on top of the black one to create a shadow effect.


It's a bit bulky, so probably requires extra postage, but I hand delivered mine so it didn't matter. And I totally think the extra postage would be worth it.

Sadly I haven't managed to create any more panels since the first one, but it's firmly on my to-do list. Especially since I now do have some silicone and I still have lots of wood left. 

And also, I bought a big canvas for a "family pour". If it turns out well, it's meant to cover up the large and ugly heater in the hallway.

Let be know if you have ever tried that technique, I am happy for any tip I can get.

Hugs 
Ela


Challenges:
Seize the Birthday: Anything goes Birthday
The Paper Players: #464 Say it Loud
CAS on Froday: #166 Big Sentiment or Word
Day of the month Card Club: #8 World Cardmaking Day 


Wednesday 16 October 2019

Quick flower wreath with Love

Hello Crafters,

I hope you're all well. 

I am still benefitting from the happiness and motivation I took from the crafty goodness at the community centre the other day.

I went back to my craft space right the next day and created two more cards. Here is the first of them: 


I stamped the wreath and sentiment in black ink and very losely coloured it with my ZIG markers, trying not to stay in the lines and not to be too exact. I found that incredibly hard. There nust be a perfectionist hiding in me somewhere. He (or she) was cringing all the time.

I trimmed down the panel so the grey card base would show on either side and added stitching to the card base with a border die. As a last step, I popped up the panel with foam adhesive.

I love how this card turned out, and it was so quick to make, I think I'll make a whole bunch of them, in different colour schemes and sentiments, just to have on hand. 


Lot of love
Ela


Challenges:
Day of the month Card Club: #8 World Cardmaking Day

Tuesday 15 October 2019

Poinsettia Christmas

Hello Crafters, 

how have you been? 

Last night, I totally channelled my inner Kelly Latevola and created this card. I used ZIG markers and only little water to colour in the image. When I didn't like the results, I added more shading with alcohol markers. Looking up poinsettias on the Internet, I found that they have a slight bend in the middle, which makes half of the leaf/petal look lighter than the other, because they catch the light differently. Since I hadn't achieved that effect, I used a mini flat blending brush and white pigment ink, to brighten up individual leaf halves.


Then I fuzzy cut the image out and started fiddling with the sentiment and card base, which was  created with watercolours. The bottom bit that looks grey is actually silver water colour. The sentiment gave me big trouble, I didn't feel I had anywhere to place it. And I had already put foam on the blue panel, stupid me. So I ended up heat embossing it right across the image.

So, why do I feel I channelled Kelly's spirit?
For one it's a floral.
Secondly I combined water colour and alcohol markers, which is something she often does.
I also used pigment powered water splatters for the background and just a touch of silver water colour to put some shine on the petals.
And I messed up this card in so many ways, it's a miracle I actually still like the final result. But I didn't start over!
And  finally: Having used white pigment ink, I outlined everything.

Kelly, if ever you read this, I love your cards and your story time. Thanks for inspiring me!


I actually do like how it turned out, even tough there is so many details I feel I screwed up.

Have a beautiful day
Ela


Challenges:
Simon says Stamp: Christmas

Sunday 13 October 2019

Hello, how are you?

Hi Crafters, 

how have you been?

I am very well, I have finally found some like minded crafters in my area, to create with about once a month. That's something that I would always have liked, but there never seemed to be anyone nearby, but in my new town it's finally come true. 

A friend of mine (who normally avoids crafting whenever she can) took me along to a bible art journaling workshop, that happens about once a month at the local community centre. 

We were a group of about 10 women, the materials provided were wonderful and the atmosphere was incredibly relaxed and cordial. After I almost chickened out at the last minute, I was really amazed how much I enjoyed it. 

And it did give me back quite some inspiration. After returning from 3 hours of craftiness, I actually sat down and created a very clean and simple "welcome home" card for my lovely landlady, who was about to return from an extended holiday.

Unfortunately I didn't have the matching sentiment, to say Welcome home, or even just Welcome, so I made it a "Hello, how are you" instead. 


As you can see, it's very simple. I just blended on some light green and blue and added the die cuts and a few sequins. Then I added the panel to a light grey card base with some foam adhesive.

But I like the simplicity of it. 


Have a beautiful day
Ela


Challenges:
Just add Ink: #487 Just add "H" (Houses and Hello)

Addicted to Stamps and More: #362 Make your Mark
 

Friday 11 October 2019

Mad llama Birthdays

Hey Crafters, 

llama tell you, I am in LOVE with this squinting llama. I made a whole set a few days ago, with backgrounds I had in my stash. I started with the gradient triangle background that I had created with one of a set of stencils. I think the colours turned out lovely and absolutely wanted to make sure I use it, before one of my cats (not looking at anyone specific...) manages to chew off the corners.


Then I coloured the llama with my ZIGs and fuzzy cut it out. I cheated a bit and made the neck longer. I adhered it flat to the card and added the sentiment strips with foam tape. The sentiments for all cards either say "Have a mad Birthday" or "Have a spectacular Birthday" in German. I think that goes really well with the squint. To draw attention to the eyes I covered them with glossy accents.


I liked the first card so much, I decided to use two older blended backgrounds as well and make a set of them. I added two black stripes with a black alcohol marker to the one, and some glass drops to the other, so they wouldn't all be identical. This time I also popped up the llamas on foam tape. 

Those two cards completed, I was was still not done with the llama, I think it's so hilarious. I fear I may never use the rest of the stamps in the set, because I'll always reach for this fellow.

So I  grabbed another prepared background. This one I had actually only kept for cutting shapes or maybe strips from it. I really hadn't liked how it turned out at the time. But I found that I could cover the parts I liked least with the llama and the sentiment, and now I think it's my favourite of the four.


I went back the next day and created matching envelopes, with very pale minimal shading.

So, that's it for today, have a lovely week-end

Hugs
Ela


Challenges:

Seize the Birthday: #176 For the Kids
Addicted to Stamps and More: #362 make your mark
Cards for Guys: #230 Spooky or use Orange (I used orange)
Addicted to CAS: #169 Creature
Day of the month Card Club: #8 World Cardmaking Day 


Thursday 10 October 2019

Flowery Greetings


Hello Crafters, 

how have you been keeping? Sadly my holiday is already over and the workload is already getting on my nerves. But at least I am still in the mood for lots of crafting, so I have a few cards in line for you. Unfortunately, now my household desperately needs my attention on the week-end. Where can I apply for a 48-hour-day?

Here is the 2nd card I created with the colouring book page a few says ago. I used pretty much the same concept as before, but changed it up a bit.


Since I had cut the flower for the other card from this piece, I didn't have a full card size anymore, so I cut it narrow and adhered it to a black card base. I have a set of cheap metallic watercolours I used a few days ago, to create some backgrounds (that I still need to use). These were still sitting on my desk and I noticed that the blue colour is a pretty good match to the teal I used in my colouring book. So I added to very thin strips of shimmery metallic paper along the edges. 

I also wanted to use a vellum circle this time, but that got a bit lost, so I cut a very narrow ring from the same metallic water coloured paper and adhered it to the vellum circle. That also gave me a spot to hide the adhesive. 

In the end I had to add some sequins, because there was a smeared spot on my paper. 

I am still not sure, which of of them I like better  - as usual. Here they are, side by side:


Have a brilliant day
Ela


Challenges:
Addicted to Stamps and More: #362 make your mark


Sunday 6 October 2019

Greetings with more colouring book pages

Hello Everyone, 

how did you spend the world card making day yesterday? 

Turned our, for me it wasn't the best of days. I managed to almost kill myself on a clothes horse - yes, don't ask... Now my nose looks, like someone hit it with Avada Kedavra. I don't remember any green light though. So maybe I'm not "the Mom who lived". I also hope it won't scar.

On top of that, my daughters seemed to want to get on my nerves last night, thus ruining my crafty mood. So in the end I went to bed frustrated and annoyed, with only one card created, only to find I couldn't sleep at all.

Well, enough complaining, today, was a much better day. I created only one card, but a bunch of matching envelopes to cards I had created earlier.

So here's yesterday's card:


When unpacking another box from the move, I found this sheet from a colouring book. I had planned to finish it and then forgot about it. Now I decided I liked it the way it is, only partly coloured and I would use it for another card or two. It was just the right size for about two card fronts.

So I cut it down and adhered it to a grey card base, with a bit of a frame. Then I simply added the sentiment circle. And by simple I mean I fiddled and tried for ages, white, grey, black, vellum, teal gradient? In the end I stuck with white, but the circle seemed too plain. Then I remembered a Sketch I had seen and decided to use it.
I cut out one of the blue flowers from the edge of the leftover paper and adhered it to the bigger circle. Since I didn't like the flower - aka the smaller circle - near the G, I simply turned the sketch around. Even though the inspirational image has a dragon fly instead of butterflies, I think my card actually matches the image as well. That's accidental though. 

I considered using the rest of the paper to dress up the envelope, but I really wanted to use it for another card. Instead I picked a stamp with a similarly whimsical flower and coloured it with the same ZIG marker I had used for the paper. It turned out a bit darker, because I had to work hard to achieve any gradient. My store bought envelopes don't take water well at all. It also turned out glittery, because I used a brush that I had previously used with metallic watercolour and obviously not cleaned out well.

A happy accident, because it gave me the idea for today's card, using up the rest of that paper. But I haven't taken a daylight picture yet, so I'll post that another day. 

Now, have a good start into the new week. 
Love
Ela


Challenges:
Fusion Card Challenge: Dragonfly

Saturday 5 October 2019

Get well monster

Hi Crafters, 

happy card making day to all of you! I hope you are having a great time in your crafty corners. 

I actually haven't created anything today, except gluing on the last piece (now dry) of yesterday's work. I did however partially succeed in repairing my bike. So at least progress there.

One of my work colleagues was off sick a while ago (nothing too serious luckily). Since this is someone I like a lot, I decided to make him a get well card. 

I stamped a very simple scene on water colour card and coloured the monster and balloon with my ZIGs. Then I added the panel to a green card base, so there is the colour surprise when you open it. I also covered the balloon in glossy accents very liberally. 


Since I don't have his home address, he only got the picture on his phone when he was still at home, but I gave him the card when was back, so he can send it so someone else - which he says he won't do, because it's all his. ;)

I adore this little monster, he's so cute. And the balloon has a really good size too.

Hope you have a wonderfully creative day
Ela 


Challenges:
Addicted to Stamps and More: #361 Anything Goes
Addicted to CAS: #169 Creature
AAA Cards: #150 One Layer