Hello Crafters,
can you believe how time flies? Only one month to Christmas eve, I can feel the panic rising... But with today's Challenge for
I did at least make a start on my Christmas cards - finally. To assist you with your Christmas card list, we are challenging you this time, to use trees on your project.
Challenge #80 Trees
I watched Lindsay's watercolour tutorial the other day, and decided to try that out myself. So here are my results.
I actually did 4 panels, but the colours one one didn't turn out right and another panel I ruined the heat embossing, so I cut it down to fix it, but I didn't like how that turned out either.
At first I was very unhappy with my trees, they just didn't look right, but when I came back the next day with a fresh perspective, they looked okay after all. Sometimes you just need to take a step back.
So, that's it from me today, I hope to see a lot of tree cards from all of you!
Hugs
Ela
Hey out there,
how are you?
I had a bit of a shock this week. My older cat, Phoebe, has lately started having epileptic seizures very frequently - well, frequently, when untreated that is. Of course we went to the Vet and had her checked and got medication for her. So she usually does not have any seizures at the moment, but the dosage is rather high and she is constantly drowsy and clumsy now. And she is totally misbehaved when it comes to food. In the past she would have watched us eat with big eyes and a hopeful purr, but nowadays she would probably sit on our plates and steal bits from the fork if we would let her.
Also she used to be an easily scared cat - not shy, but very jumpy. She never went outside, even if the door was open, the world out there was just too scary.
Last Thursday, she managed to open the front door and sneak out late at night. By the time we realised, it was morning and the night had been a very cold one. I spent all day searching and calling vets and animal shelters in the area, worried sick, because she isn't used to the outdoors and she didn't have her medication. It was so out of character for her, I actually thought she had gone out to die somewhere alone.
You can't believe my relief, when my father-in-law told me that he had chased up a cat in the garden, but he wasn't sure it's mine. I started looking all over again, and really, I found her in the last corner underneath some toys and stuff, shivering for cold and fear. Stupid thing, the front door was open almost all day... She actually let me pick her up and carry her inside, where she hid somewhere to recover from the shock, the poor thing.
Happy to have her back, I spent the rest of the day, telling all the vets, shelters, friends and family that I had her back. Don't tell my boss, I should have worked, but I can't say I was very effective that day. I made up for it yesterday, working late. And I had the front door repaired today, so she can't open it anymore now - just in case she didn't learn from that experience.
So, done with cats, today I have another furry friend to show you: my favourite donkey Schorschi on a baby card. He's so cute and he doesn't run away.
This time I coloured him with my ZIG Markers, just a bit of simple shading. I cut him out and sponged some pink ink on the card base, where I wanted him to go. Then I stamped the Baby's name directly on the card base with the beautiful Concorde&9th Perfectly Penned stamp set.
Sorry you can't see that, I covered up the name, because I didn't think the parents would want me to reveal the name on the Internet.
The Hello was stamped on white card stock and coloured pink, while the outside was coloured in cool grey, to tie in with the donkey's colour.
And since it's for a little girl, it needed sequins, so I chose matching colours and scattered them in clusters around the card.
Have a great day
Ela
Challenges:
Simon says stamp: Furry Friends
Hi Crafters,
I've been running late with posting my Halloween cards, so here is the very last one for this year. It's actually the invitation we sent out for last year's Halloween party, but I didn't post it then and I really don't want to put it off another year.
I stamped the images and sentiment on a panel watercolour card stock and coloured the images with my beloved Inktense pencils. I kept the design and colouring simple, because I needed to mass produce these cards.
The panel was adhered to an orange card base, for a fun twist.
As I didn't have matching orange paper to create the envelopes, I used vellum envelopes instead. I am obsessed with these at the moment, they are so beautiful and match almost any card.
Have a nice day
Ela
Challenges:
Always Fun Stamping: #30 Halloween
Shopping our Stash: #327 Halloween
Addicted to Stamps and More: #266 Anything goes

Hi Crafters,
are you ready for tonight?
I thought this Halloween would be especially cool for us, since it is a bank holiday in Germany this year. But actually this has caused a lot of families, to make other Halloween plans. Therefore our own party will be a lot smaller than it was in the past years, as so many kids are not coming.
But we decided to have fun anyway. So, here is out invitation this year.
Since I don't write Halloween cards to friends (Halloween is not that kind of holiday in Germany), I always try to refrain from buying any Halloween stamp sets. With the result that I have to make do without them for the Halloween invitations.
This year I was feeling particularly uncreative, until I came up with the idea to use creepy nighttime trees as a backdrop. From there it all was so easy.
I didn't have any light purple card stock, so I printed the invitations on white card stock, making sure that I got the spacing just right, so I could cut two card bases from each sheet of paper. Then I sponged on some lilac ink around the edges. I also sponged some additional card stock strips with the same ink, to back the sentiment strips with later on.
I embossed black card panels with a tree silhouette embossing folder and enhanced the pattern with white pigment ink. Then I adhered three sets of differently sized googly eyes.
For the sentiment I picked a creepy-cute spider's web font and printed "invitation" on orange card stock and cut it to uneven strips. Those I backed with the extra lilac card strips I had prepared.
Last I assembled it all and printed the names on the envelopes with the same font.
Now, go ahead and get creepy!
Ela
Challenges:
Always Fun Stamping: #30 Halloween
Night Shift Stamping: Bäume
Stempelküche: #81 des Nachts/Night Time
Simon says stamp: Anything goes
Shopping our Stash: #327 Halloween
Hello Crafters,
how time flies. It's almost Halloween, which is traditionally the point in time, when I switch from worrying about being late for the Halloween Party preparationsto whirring in Christmas panic mode.
But there is always time for a Challenge at
This time, we ask you to get out your die cutting machines and use
Challenge #78 Two Die Cuts/Punches
My card this time is very simple, as I was running late and my schedule was busy. I revisited an idea I had used before, but made it into something new.
Here is the original idea:
I coloured the die cut with distress inks in fall colours and stamped a simple Birthday greeting in brown ink. I debated long with myself whether to doodle a border or not - well I shouldn't have, I don't like how it turned out, but since I had already adhered the leaves, I didn't want to start over.
So, now it's your turn, what will you create?
Hugs
Ela
Challenges:
Simon says stamp: Anything goes
Creative Friday: #191 Autumn
Fusion Card Challenge: Autumn Leaves
Hi Crafters,
are you ready for Halloween? We're having our yearly party and I am already in panic, because my preparations aren't as far as they should be.
However, I have a very simple card to share.
I have this huge supply of googly eyes, because I always seem to stack up on them, whenever I find any. I don't even know why, I don't use them that often.
So I wanted to use some of them, and try out my glow in the dark embossing powder.
I don't think I need to explain how I created any of this, it's too simple. Only the embossing was a bit tricky, the powder wasn't very clear in my first two tries. Then I decided to stamp the sentiment with white embossing ink instead of clear and put the powder on top. That worked better, but the sentiment is still rather faint in the light. In the dark it looks pretty cool.
Do you have any tricks on using glow-in-the-dark embossing powder? If yes, I'd be grateful if you could share them.
Creepy Halloween greeting
Ela
Challenges:
Simon says stamp: Anything goes
Creative Friday: #191 Autumn (I hope Halloween counts)
Hello Crafters,
If you have been reading my blog, you might have noticed, that I hardly ever use patterned paper. Mind you, I love patterned paper, I just can't let go of it. And I am not good at using it on cards, I never seem to know what to do and where to place it. For today's card, I actually did! So it's a double challenge for me because this card is for another challenge at
This time, we are encouraging you to create a card with arrows:
Challenge #77 Arrows
I actually found this one rather challenging
indeed. I knew I wanted to use my AladinE StampO Arrow stamp set,
because these are pretty much the only arrows I own. And besides I
bought them years ago, because they were rather inexpensive, and hardly
used them since.
So I started out stamping a panel of different arrows in green ink, but then I was a bit lost as to what else to do. I decided I wanted them to pop out more, so I outlined them with a grey alcohol markers and a blender, creating a shadow.
After that I spent some time pushing it around on a black and grey card base, feeling a bit lost some more, before I remembered that I have seem some really neat layering with several smaller layers lately. Mostly on scrapbook pages, but I decided: I can do that too! So I die cut a stitched panel from green card stock and vellum and from my arrow panel as well and tried to arrange those, but it just wasn't working for me. So I pulled out a leftover piece of that brightly striped patterned paper. I love that one, it's so cheerful. And I have several sheets, so I can actually use it. With a panel of that paper, it finally worked for me, but I wanted a bit extra for the card base, so I pulled out stencil and some clear embossing paste to create a subtle texture.
I arranged the panels and added a black die cut and a white embossed sentiment strip. It means "Hello how are you?" in German.
I only recently invested in quite a few German sentiment dies and I really love them. I generally tend towards German sentiments, as I am making cards for friends and family, who mostly don't share my love for the English language.
I adhered the die cut to the black strip, which was in turn adhered with foam tape. So the Hello floating over the panel. I also added a, arrow paper clip, to tie in the arrow motto some more.
For the envelope, I used the same patterned paper and my envelope punch board.
So, now it's up to you, I hope you join us!
Ela
Hey Crafters,
how are you all? I hope you're all well.
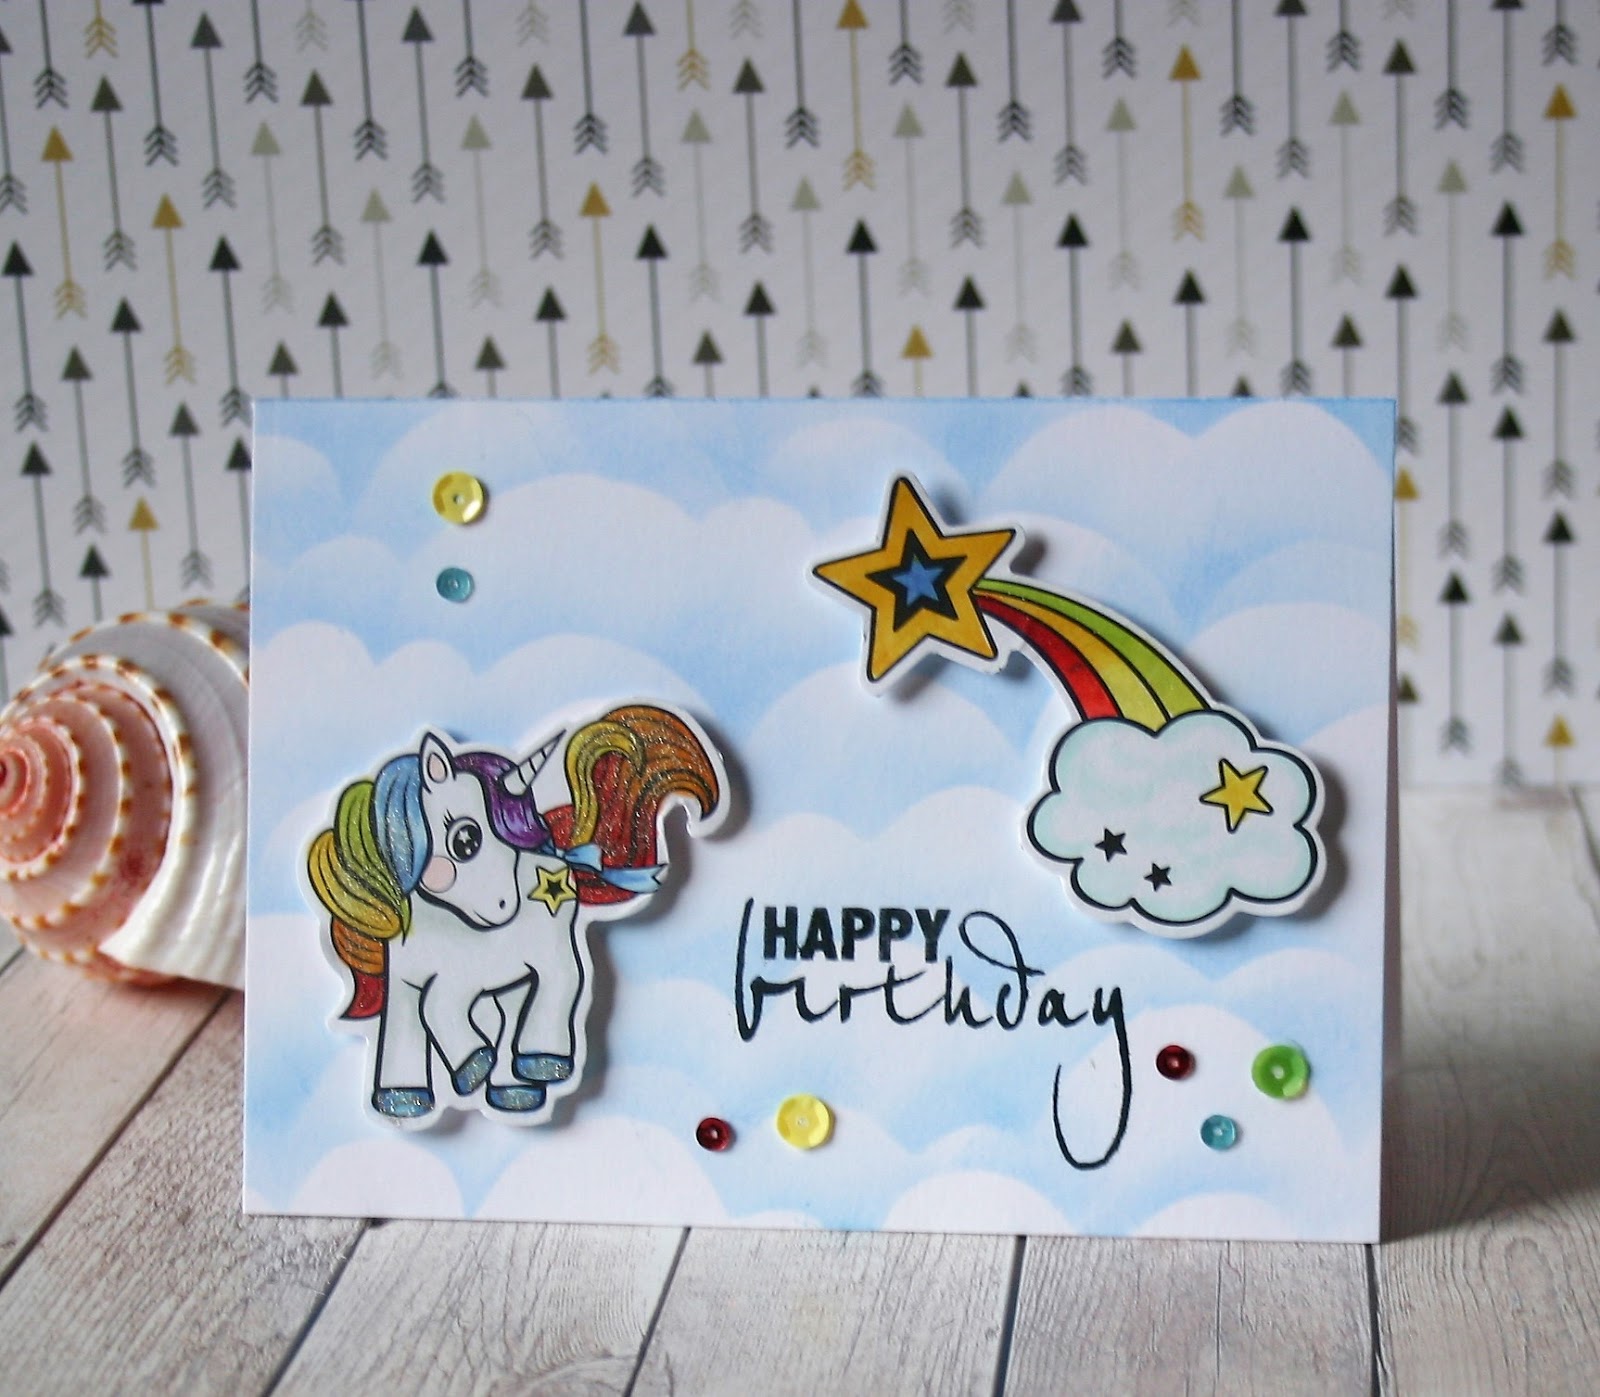
Today I'd like to show you another card with the colouring stickers. This time I used one of the girlie sets, to create a Birthday card for a school friend of my daughters'. Unicorns are very popular at our school right now.
I started out without knowing where I wanted to go with this card, I just knew I needed it quick. My girls suggested unicorns, and since I don't have any unicorn stamps I decided to use one of the stickers. I chose the easiest one, because I wanted rainbow hair and the sectioned mane seemed best for that. I coloured the image with alcohol markers, with rather simple shading. As I wanted to pop up the sticker, I adhered it to white card stock and cut it out.
When trying to arrange it on the card base, I decided the image is a bit small, so I coloured the cloud and rainbow as well and also stuck it to card stock.
I had planned to just sponge a bit of blue behind the unicorn, but with two images that didn't seem a good solution anymore. So I decided to sponge on some clouds. Turned out, I don't even own a cloud stencil, so I used a piece of card stock to create my own. I used a rather long strip and cut cloud shapes from both sides, so I could turn and move the stencil to get different arrangements. I think that turned out pretty cool, I'm glad I did it that way.
I stamped a nice Birthday sentiment and added a few sequins in rainbow colours. At last, I added lots and lots of Wink of Stella, because unicorns must be glittery.
When I was done, by daughter instantly claimed that card for herself and didn't want to give it away, so we recreated it with a different unicorn for her. Only hers is not a card, just a panel, so she can put it on her magnet wall. In the end she was very happy to keep the new version, because we had made it together and she'd done all the sponging and part of the colouring herself.
Now have a magic day!
Ela
Challenges:
Fusion: Sunshine on a cloudy day
Stempelküche: #79 Märchenhaft/fairy tales
TCP: #340 Sparkly
Seize the Birthday: Anything goes Birthday
Addicted to Stamps and More: #262 Make your mark
Hi Crafters,
how are you? we are enjoying the holidays a lot.
A while ago, I found some amazing stickers at the Dollar store (actually Euro store, but that sounds wrong to me). They are colouring stickers, so you can customise them yourself. I bought a pack with robots, because I liked them a lot and I have that cogwheel die, that goes so well with them. But it turned out there are 4 sheets (48 stickers) in the set, with all different images: robots, pirates, dinosaurs and aliens.
So I guess that's sufficient for all the Birthday cards for the two baby boys in our family for the next few years, and it cost me only one Euro. I have actually already gone back and got myself some of the other sets, with unicorns, mermaids, fairies etc.
I started by colouring one of the images, just to try how they would stand up to alcohol markers. They do, but they bleed quite a bit, if you apply lots of colour, so I had to be a bit careful with my colouring.
When I was done I though "Man, he looks grim, can I even use him?" So I decided the sentiment would have to be something aggressive, like party attack or party alarm.
That decided, I created a galaxy background with water colours, because I really, really wanted to try that for ages, and never had a great idea how to use it. So this was my chance, and I grabbed it.
I didn't like who my first galaxy turned out, so I created a second one. I think that one could have been darker in places, but as the first was too dark, I went with it. I didn't want it to end up too dark again.
To give the alien something to look at, I coloured one of the smaller images, a planet. Then I die cut the word party from white card stock and created an ombre effect on the letters with my alcohol markers. I also die cut a that spiky comics speech bubble, coloured it bright yellow and stamped alarm on it.
When I had it all adhered down, I realised that the dark background shimmers through the stickers, but I couldn't peel them up again. Next time I want to use and of them on a dark background I'll back them with white card first.
Anyway, I like how it turned out and I am very content with these stickers. Here's a closer look at the boys set.
Have a nice day
Ela
Challenges:
Seize the Birthday: Anything goes Birthday
Addicted to Stamps and More: #262 Make your mark

Hi Crafters,
how are you all?
I am fine today, over here the fall holidays started and I am more than happy to be rid of all the homework for two weeks. The last few weeks were really tiresome.
So, today I am showing you a school related card, even though we're already 5 or 6 weeks into the new term.
A few days ago, I found to photos of cards I made on my mobile, that I had totally forgotten. Here's the first of them. The school bag is a digital freebie and the robot is from a digital stamp collection. Both are printed on watercolour paper. I coloured the images with water colours, but I am not sure anymore, which medium. Probably my Inktense pencils.
Then I just adhered the panel on a green card base. No sentiment this time, I wrote a personal message on the inside.
Also, I am proud to announce, that my card with the little dog made the top 3 over at Night Shift Stamping.
Hugs
Ela
Challenges:
Less is More: #348 Water Colour
Simon says Stamp: Anything goes
Addicted to Stamps an More: #261 Anything goes
Always Fun Challenges: #25 Anything goes
Hello Everyone,
how do you do?
A while ago, I received a pad of patterned paper as a surprise gift from a friend, which made me sooo happy (thanks again!). And as you may know, I struggle a bit, with letting go any patterned paper, so I decided to use the first sheet right away, just to make a start on the pad.
And I wanted to send her a card in return, so I combined both ideas. I created a small envelope with my envelope punch board and punched out some tiny hearts from a scrap of red card stock. I adhered it all to a white scalloped panel, so the hearts would fly out of the opened envelope.
Then I mounted the panel on a craft card base with a strip of the same patterned paper peeking out. I also embellished the inside and the envelope with some more hearts and covered all of the hearts in Glossy Accents, except those on the inside.
That's it from me, have a great day!
Ela
Challenges:
Addicted to stamps: #261 Anything goes
Always Fun Challenges: #25 Anything goes
Hello again,
here's another Birthday card for you. You can't ever have enough of these...
As you may know, I love cat stamps, and when I found this fish bone stencil, I knew I had to have it.
To try it out, I wanted to create an ombre effect with embossing paste. Unfortunately that didn't work out as intended, but I used the panel anyway.
I stamped, coloured and fuzzy cut the cat and embossed the sentiment on vellum. I adhered the cat to the card front, so that it looks like it's hanging off the sentiment strip.
See you soon
Ela
Challenges:
Seize the Birthday: Anything goes Birthday
Just add ink: #378 Texture
Hello Crafters,
it's challenge time again at
This week, we have a beautiful versatile Sketch for you:
Challenge #75 Sketch
I personally struggle quite a bit with sketch challenges, I usually tend to leave them out. But this one I liked so much, I couldn't stop myself and created three cards - with the intent to do a whole series with all my critters and washi tapes.
I have been playing with my Polaroid frame dies a lot lately and this sketch made me reach for them once again. So I chose a cute doggy and a few accessories and coloured them with alcohol markers. Then I added just a few strips of Washi tape and a slim sentiment strip and that's it. Very clean and simple.
After a day or two with this card still sitting on my craft desk, I decided to go back and create a second card. This time I chose two fish stamps by Dyan Reaveley, because they are just so hilarious. I coloured them in greens and yellows and added yellow and aqua Washi tape. For a pop of colour I chose some Washi with Flamingos and added a sentiment strip in the same Flamingo pink.
For the third card I picked one of the cats in the Tim Holtz set and coloured a bit of a background scene to ground him.
For all three envelopes I just added strips of the same Washi tape under the address area.
Now it's over to you, what will you make of this sketch?
Hugs
Ela
Challenges:
Seize the Birthday: Anything goes Birthday
The Daily Marker: 30 days colouring Challenge
AAA Cards: Creatures Great or Small
Nightshift Stamping: For boys/men (the dog card)
Simon says Stamp: Clean & simple
Hi Crafters,
How are you? Hope you're having a better week-end than me.
I am suffering a bit from lack of sleep and worry right now, because last night my older cat Phoebe had some kind of epileptic seizure. We had to go see the vet in the middle of the night and afterwards I sat up all night with her, because she was under strong medication and I had a bad feeling about her condition. I didn't want to sleep and not be there fore here, in case anything more happened.
It all looked pretty bad at the time and even though she is better now, she obviously is still not well.
To balance my worrisome news, I have a quite cheerful card for you today. For this one I used some supplies, that usually make me struggle a bit: patterned paper, a border punch and alcohol markers.
I love patterned paper, but I really really don't know how to use it. I find it a bit scary and on top of that, if I like it a lot I really struggle letting it go. Cutting into it is really hard for me.
Therefore I have decided not to buy any paper packs anymore, with few exceptions. One of them is paper I can use as a backdrop for my card photos, which I keep separately in a pizza box, to avoid accidentally using it. A bit paranoid really, as I am so reluctant to cut any patterned paper.
The other exception is a crafty outlet I visit every now and then. If they have papers I really like, I get several sheets of the same patterns. This way I am not so worried of using them, because I know I have enough. That's were I got this paper as well. I love the cheerful colours.
Punches are not so scary to me, but as I store them in a box, I tend to forget them. That is why only recently I moved the most versatile ones to a drawer, where I can easily access them. Otherwise I would probably not have used the scalloped border...
And as for alcohol markers: I own hardly any Copics, I use a German brand which is much cheaper, but most of them have bullet tips and I struggle with them quite a bit. But I am trying to get more accustomed to them.
I started out on this card, with several ideas I wanted to combine. I knew I wanted to use a row of tiny Polaroid frames with some small critters and I also wanted to use that paper again. I made another card with it only recently and loved how it turned out. And of course I wanted to use my alcohol markers for some very simple shading.
So this time, I pretty much did what I had planned. The sentiment means Congratulations (actually we congratulate) in German. It got lost a bit on the pattern, therefore I stacked it up to give it more dimension.
I also embellished the inside of my card, with a strip of the same pattern and a few circles, which I cut out from the backside of the same paper.
I didn't create an envelope yet, but I think I will just go with a vellum envelope. They look wonderful with almost any card. Besides I probably hand over this card personally, because of the bulk.
That's it from me for today, have a great day.
Hugs
Ela
Challenges:
Stempelküche: Haustiere/Pets
AAA Cards: Creatures Great or Small
Seize the Birthday: Anything goes Birthday
Simon says Stamp: Stamp it
The Daily Marker: 30 days colouring Challenge
CAS on Sunday: #116 Color me Pretty, use Pencils or Markers
Hi Crafters,
how are you today? I am feeling fine, though already pretty fed up with school. It's been only three weeks, I wonder how I will ever make it through the year.
Today, I'd like to intruduce you to our newest familiy member Schorschi, isn't he adorable? I think he is so cute!
He originally is a Freebie digital stamp, and you can get him at Birka's. She had a few of her freebies made into actual stamp sets, Schorschi among them, and I won him last week at the Task for Two Panda Challenge. Thanks again Birka!
When he arrived I was having a rather tough day, and by the time the kids were in bed, I really needed a bit of me-time. So, I coloured him with alcohol markers, in cool greys and neutral greys, and a bit of peachy pink for his ears and belly. Then I cut the panel to look like a torn page from a notebook and added the small happy Birthday sentiment strip, which is heat embossed, as usual.
For the background I wanted to imitate some of the beautiful pattered paper with water colour stripes that are out there at the moment. I chose a skin colour and mixed in the tinyest bit of red to match the pink on the ears and belly. As the panel is regular cardstock, I used only very little water. Then I die cut the panel to a convenient size and adhered it to a black card base.
Schorschis panel was popped up with foam tape and I also added a star shaped paper clip.
So, that's it from me today, I hope you have a good day
Ela
Challenges:
Stempelküche: Haustiere/Pets
AAA Cards: Creatures Great or Small
Seize the Birthday: Anything goes Birthday
Simon says Stamp: Anything goes
The Daily Marker. 30 days colouring Challenge