Saturday, 27 December 2014

Challenge up your life: Challenge #5 Craft cardstock


Hello Everyone,


it's Challenge time over at 


Today, we're challenging you to use craft cardstock. This challenge nearly got me in trouble myself, because there is hardly any craft cardstock left in my stash. It’s kind of hard to get where I live, and I got what I had at a craft fair last year, which isn’t due until midwinter.


Luckily I still had 2-3 card bases and enough scraps for the die cuts.


I started by cutting and coloring the Happy Birthday sentiment from white cardstock. Then I carefully adhered it to the card base and arranged the other words around it. Adhering it all was a bit of a mess. I used matt medium, because it’s not so obvious when it seeps out the sides.


When all sentiments had dried I cut off the overhang and added a few red sequins with glue dots.


Hope you’ll all join us in our challenge and have lots of fun with it.


Hugs

Ela

Sunday, 21 December 2014

Gift wrapping mania

Hi Crafters,

today I am almost back on schedule with my Christmas preparations, thanks to my still ill daughther, who woke me early on Saturday morning to ensure my bed sheets got washed again. I'll spare you the details. As I didn't have a bed to sleep in anymore, I got up at 6:00 and started gift wrapping, so I got a whole lot done on Saturday.
Today was not as productive, but still pretty busy. We decorated the tree for my in-laws, bought our tree, visited some friends with little gifts and I started creating more wrapping paper. That's still on my schedule for tonight.

But  before I start, I'll just quickly show you the some of what I did yesterday...

The first set are made from little flat white bags, for cards or small juwelry. I wrote Merry Christmas at an angle all over them and tied them shut with red ribbon to which I added a few small bells or baubles and the tag.  The one on the far left is different, that's from one of my daughters to the other. We stamped snowflakes all over the bag and closed it with a blue fuzzy ribbon. The tag is colored by my daughter.


The next is very simple, I kept the white paper and tied a bright pink ribbon around several times. You might guess, it's for a girl. Therefore the tag is kept in pink as well. 


The next one was rather large, so I devided for something quicker and splattered the paper with colored inks for my mister bottles. 


Now, I need to get the ones for my own kids done. 


Hope you have a less busy time!
Ela

Friday, 19 December 2014

Homemade wrapping paper

Hi Crafters,

thanks for all of your good wishes, for our family health. I really appreciate that you care. Times are so careless in many respects, it's good to see that in the card making community it's different.

My girls and I visited my mother-in-law today and her son spoke a word or two with her doctor, so things are a bit clearer now. It's been no stroke like we feared. She will recover and is already feeling better again, though she's by far not up to her usual self. We're all very relieved and hope that she'll be back by Christmas eve (in Germany we celebrate on the 24th, not the 25th).


I also made some progress today with my preparations. After work and the hospital visit, my girls and I went on a longish Christmas shopping trip to the supermarket, to get all things that needn't be  bought at the last minute. And then we spent all evening creating our own wrapping papers and wrapping the most urgent presents, those that need to go in the mail. 

The first one is for my Mum. I wrote Merry Christmas all over the paper at a diagonal, with a black calligraphy pen. Then I traced the words messily with a normal silver gel pen, to make it more festive. I really do like how it turned out, even though I usually don't like my own handwriting much.


This next gift is for a 5 year old girl, so I picked one of my pre-made tags and matched the colors on the paper to it. I cut a piece of paper to fit the gift, wrapped it the way I wanted it, but without glueing it down. Then I traced a curly line with a pencil and flattened out the paper again, to stamp and color the Christmas lights. That was a bit tricky, because the paper absorbs the alcohol markers a lot more than the cardstock I usually use, so I had to make sure not to color too close to the lines. I think I really would like it better without the bow, but I needed something to hold tha candy cane...


The third gift is for her older brother, so I chose a blue-green tag. Not wanting to do the lights again, I chose the Lawn Fawn snowflake set and aranged all the snowflakes except the negative one on my stamp press and stamped them all over the paper in blue ink. I love how well that went. Those snowflakes are so playful. 
When I had it all wrapped up, I realized I forgot part of the gift, so I packed that in a piece of white paper and stamped a single blue snowflake on top, to set it apart from the main present. Then I tucked in the little piece below the candy cane.


The forth paper was created by my daughters, with a lot of fuzz and discussion. I didn't want to cover too much of the design, because I really like how the stars turned out, so uneven and sketchy. So I didn't add a bow but only a small snowflake to hold the tag.


There's more to come, but for today I am done. Tomorrow the girls will spend the day with their Dad and Grandpa, so I'll be free to really get back in schedule - hopefully.


Have a great time
Ela


Challenges:
Come and get it: Merry Christmas
Pile it on: #49 Anything goes Christmas
That craft place: Christmas
A crafty mess: #2 Anything goes Christmas

Thursday, 18 December 2014

Christmas preparations

Hey Crafters, 

I must apologize, it's been very quiet here lately. You'll probably have guessed it: Christmas is coming fast and I am - again - behind in my preparations. Every year I promise myself to get going early. Every year I think it must be possible, to do it all, before it starts to get stressful.
And I made a good start too, I had most of my cards ready in November. 

But as usual, Christmas has crept up quietly and now it's stabbing me in the back. 

I had a booth at a local craft fair for two evenings last week-end, which kept me busy with preparations for quite a while. It was the first time ever for me. Unfortunately I can't say I sold all that much. But it sure was way more fun than I had expected. The other crafters and artists were really, really nice and welcoming, and I am considering to join their Easter fair this year, even though it really didn't pay.  


My daughters have been ill, one after the other which has ruined my plans entirely. I couldn't do any Christmas shopping for 4 weeks, because I always had a sick child at home, and they were really weak and feverish. I've changed and washed piles of bed sheets, because if no kid was sick on them, then surely the cat would step in. 

And if that hadn't been enough, my mother-in-law had to be brought to hospital in an ambulance this week. We're not yet sure what and how bad it is, we just have to hope that she'll be better soon.

But despite all difficulties, I'll get there in the end. The school holidays are close, tomorrow is the last day of school, and I only have 3 more workdays to go. Also I did a lot of shopping yesterday, with my sick child in tow (poor thing), and completed the rest of it today, when their Dad was looking after them for me. 

Now I only have to buy the tree, wrap all the presents (which includes creating my own wrapping paper this year  - stupid me), write and send the cards and those gifts that need to go in the mail. And plan (and shop) the Christmas dinner, which has fallen to me now. Poor family, I'm no good in  the kitchen. 
Boy, I better don't think of it, the longer I think, the longer the list gets...

Anyhow, I managed to craft something today. As teacher's gifts are due tomorrow I created 7 little tags to go with them. I didn't use the tags I had, because I wanted them to go with the candles, but my girls wanted to use the cat stamps. So I compromised on the cat tangled in Christmas lights. On the back they say "Merry Christmas and a happy new year" and the names of my girls.

Here's a picture of the tags. I colored all different cats, but kept the light bulbs all in red and green, because that's what I used on the candles.


And here one of the whole gift with the wrapping and Phoebe. 


I absolutely love those Newton's Nook cats, they are so cute, without being too cutesy. 

I wish you all a relaxed and healthy Christmas time. I'll try to post some more the next days, but I simply can't promise.


Love
Ela


Challenges:
Muse: #98  


Saturday, 13 December 2014

Challenge up your life: Challenge #4 Christmas without Christmas stamps / Weihnachten ohne Weihnachtsstempel

Hi Crafters,

it's Challenge time again over at 


This week, we're challenging you to create a Christmas project without using any Christmas stamps. 
 
Without the option to use stamps, I decided to go for Christmas die cutting and used my Simon says stamp Merry Christmas word die. It's so intricate, I scolded myself for the idea all the way.


First I cut my main panel and adhered all the die cut Merrys white on white at an angle. And what a mess it was. I used matte medium, because it's less obvious once it's dried. It seeped out a lot, but I dabbed it away with a paper towel and you can't tell, now that it's dried.

Then I colored one of the "Christmases" red with an alcohol marker and also the edge of the mat I had cut for my main panel. I die cut the large Simon says stamp snowflake from white and craft cardstock, but it was just too big for what I had in mind. I really wished I had ordered one of the smaller ones as well. But then I had an idea and I cut off a bit of all the longer arms of the snowflake, in a way that wasn't so obvious. Now they had the perfect size (see picture).

Left side original, right side cut to fit
 I adhered the white snowflake on top of the craft one, a little off center to create a shadow. Then I adhered the word on top and glued it all to my card, but only in the center, so it wouldn't lie flat.

At last I assembled it all and adhered another white on white die cut onto the envelope.


I do hope you'll all join in and have a lot of fun
Ela

Tuesday, 2 December 2014

More Christmas cats

Hello there,

I have something to confess today:
I am madly in love with my new supplies. I just wish I had more time. But you all know how busy life is this time of year.

After three postings yesterday, today I'd like to show you the last card I made last week-end, with my new Newton's Nook stamps.


I colored the tree and kitty with alcohol markers, brushed on some Wink of Stella and Glossy Accents on the ornaments and assembled it all to a very simple little card. 

I love the simple look, I think I'll make quite a few similar ones. The red card base is stamped with a large Christmas words background stamp in Versamark ink, to create a tone on tone look.

I also created a few tags with the new stamps and my new tag dies. I love the stitching. And the images have the perfect size to fill the tags.


Happy Christmas time
Ela


Challenges:
CAS on Sunday: Children's Card
Inky Paws Challenge: #16 Christmas 
Simon says Stamp: Anything goes
Totally Gorjuss: #264 Christmas Animal

More Christmas lights

Hello Crafters,

actually I hadn't planned to post my latest Christmas lights cards, because I'd shown so man already, but there is an inspiration picture over at showCASe your style these two weeks, that simply screams for them.


So here they are.


 I also created a matching small gift for family and friends. 


Have a great day
Ela


Challenges:
ShowCASe your style: #3 photo inspiration (see above)

Thank you card

Hello again,

Just a very quick posting, to show you another card I created last week-end.


This is one of the cards that turn out entirely different than intended. I started out with a completely different vision of what I wanted  to do, that sometimes just happens.

I used distress inks for the background acrylic block stamping. And actually I used a large rectangular clear stamp instead of an acrylic block. I wanted to try it out how that worked and I really like it.

Then I die cut a white stitched panel, a larger black scalloped one, and also the words and the arrow in black. I used liberal amounts of clear Wink of Stella on all black pieces and assembled the card. Then I added just a few sequins.

I also created a matching envelope with the same technique and embellished the panel with three tiny black hearts. 


Hope you all have a great day
Ela


Challenges:
Simon says Stamp: Anything goes
Creative Friday: #116 Acrylic block printing

Christmas cats


Hi Everyone,

I hope you all had a good week-end.
All of a sudden it’s December, and I really have to get going, with regards to Christmas presents and summer holiday planning. At least I have most of my Christmas cards prepared already.

I also gave myself some stamps as a pre-Christmas present. I am feeling quite guilty for spending the money, but they are all Christmas sets. To get them after Christmas is not really useful, so I decided to get them now, while I can still use them on Christmas cards. I ordered them from UK and I really thought they would take longer to be delivered. They came pretty quickly, so I used the week-end to create the first cards with them.


Nala
This is clearly my favorite card with the new stamps so far, because I colored the cat like my little devil. I’ll keep this card secret from my daughters and give it to them for Christmas. I don’t usually give them a Christmas card, because we celebrate together, so they usually just get tags on their gifts, but I know they will appreciate this one a lot.

I stamped the image with Memento Tuxedo black ink and colored it with my alcohol markers, including the background. Then I cut a stitched panel and a scalloped white mat with my new die set from Mama Elephant (Julia, your fault I had to get these… ;)) and adhered it all to a red card base and added a few sequins.

Phoebe
I really need to find a good way of coloring my other cat as well. She is black and red, but mostly black with only very few clearly define red spots. Most of the red is mixed in, so that’s a bit more difficult. This is her at the left.


Lots of kitty love

Ela


Challenges:
CAS on Sunday: Children's Card
Inky Paws Challenge: #16 Christmas 
Simon says Stamp: Anything goes
Totally Gorjuss: #264 Christmas Animal

Saturday, 29 November 2014

Challenge up your life: Challenge #3 Türkis und braun / Turquoise and brown

Hi Crafters,

today we are challenging you again, over at 


The Challenge this time is:

Challenge #3 Turquoise and brown

I personally find color challanges rather hard to do, I usually have trouble finding the right colors in my stash. So I often leave them out, but this time that was no option!


So I decided to use my new alcohol markers for the brown and some shadow ink and distress inks für the turqoise. 

I cut a small panel with rounded corners, white embossed the bunny and the moon. Then I masked them off and sponged on soft pool and tide pool shadow ink and darkened the edges with a littly salty ocean and peacock feather distress ink. I left a bit of a halo around the moon, not too defined. 

Then I masked off the top of the panel with a torn edge and sponged a mountain range in the background with salty ocean, peacock feather and a Stampin' Up smokey slate. Then I colored in the bunny with alcohol markers and added faux stitching and a few small stars with my gel pen. 

After the panel was finished, I spent ages to decide how to arrange it in my card base. I tried twine, different banners, different positions. I wanted the banners do be either stamped in turquoise or brown, but with my choice of inks it always turned out splotchy. 

In the end I changed my mind and stamped the banner in brown vintage foto, then colored it with alcohol markers. After I finished coloring, I heat embossed the banner edge and the sentiment in white on top. 

I added faux stitching with a brown multiliner around the white cardbase. Then I arranged and adhered a little thread under the panel and popped up the panel and the banner on some foam dots. 

Then I added the same brown stitching on the envelope. The very last thing I did, was adding some puffy paint on the bunnys bottom.


I hope you'll have lots of fun with this Challenge.
Love
Ela

Wednesday, 26 November 2014

Christmas Owl

Hi Crafters,

I really haven't gotten around to much crafting lately.
One of my daughters is still ill and can't go to school, but I have to work from homeoffice anyway. And I am under the weather myself. I lost my voice almost entirely and that had to happen this very week, when my office phone never stopped ringing and my daughter wanted to chat practically all day. 

Anyway, I absolutely wanted to participate in this months Challenge over at Gerda Steiner Designs, because I've seen Julia from Just one more Card use this sweetest owl of all. 

I don't often use digi stamps, because my printer's ink bleeds terribly, with just about every coloring medium there is. But my colleague has an old laser printer to give away, so if I can somehow fit it in, I'll be able to use digital images more regularly. And I absolutely WANTED that owl!


I printed the owl with my normal printer, so I had to use my watercolor pencils without water. Then I masked off a circle around the owl to watercolor the nightsky background. I was very careful, to color as close to the lines as possible, without touching them. It worked better than I had thought. Unfortunately the color seeped underneath my mask, so I had to cut it down after all. 

That ruined my plan for this card, so it took me quite some time to figure out how to finish it off. In the end I used my last craft cardbase, heat embossed the sentiment in white and added a doodled border to it. Then I  adhered the framed circle and the snowflakes.

I am also adding this card to two sketch challenges. I think it fits both, interpreted a bit losely.


Happy Thanksgiving to all of you.
Ela


Challenges: 
Gerda Steiner Designs: Owl wish you
CAS on Sunday: Children's Card
Simon says Stamp: Anything goes
CAS(E) this Sketch: #101

Fusion Card Challenge: Sparkly Christmas


Stempelküche Challenge #8: Untypische Weihnachtskarte / Unusual Christmas card

Hello out there,

Mias Stempelküche is a lovely German online shop, selling mostly clear stamps and matching dies, e.g. Lawn Fawn, Mama Elephant, Newton's Nook and many more. But they also have their own line of really cool German sentiment stamps. 

And they have a Challenge blog which today starts the 

8th Challenge: Unusual Christmas Cards


And I was chosen as a guest designer for the month of November. I am so happy and proud. Thanks so much to the team for picking me! 

This challenge I found really challenging. That's why I approached it directly, even before I created the card for challenge #7. I pondered it for a few days, and then dipped right in.

 I had all those tiny white stars left over from another project and decided to use them for a shaker card.That was also a challenge in itself, because I've only ever made one shaker card before.


I decided to go for bright pink and grey to go with the white, as well as a large die cut sentiment, that I could stick right over the acetate. As I already had stars to go inside, I kept with that theme and used the Paper Smooches stars dies. I didn't have a bright pink cardstock, so I sponged some white cardstock with Picked Raspberry distress ink and die cut the words and lots of stars from it.

To add some interest to the frame I used a stencil to add white dots of embossing paste. I also added a single pink star to the inside of the card and three grey ones to the envelop.

And here's a close up of the stars when shaken. As you  may have noticed I also added a few larger pink stars to the inside.


I hope you all participate in that challenge, because I had heaps of fun.


Love
Ela


Challenges:
Simon says stamp: Anything goes

Sunday, 23 November 2014

Another very simple Christmas card

Hello Everyone,

hope you're all fine.
One of my girls is ill, and kept me awake half the night. Well, actuallyit's not her fault, after she woke me, she was soon back asleep, only I couldn't sleep anymore. So with me tired and her sick, we all stayed home for most of the week-end.

But at least we managed to go to the pharmacy and the super market, and have a shot at our small, handmade Christmas gifts. I'll show them these days, when they're all finished.

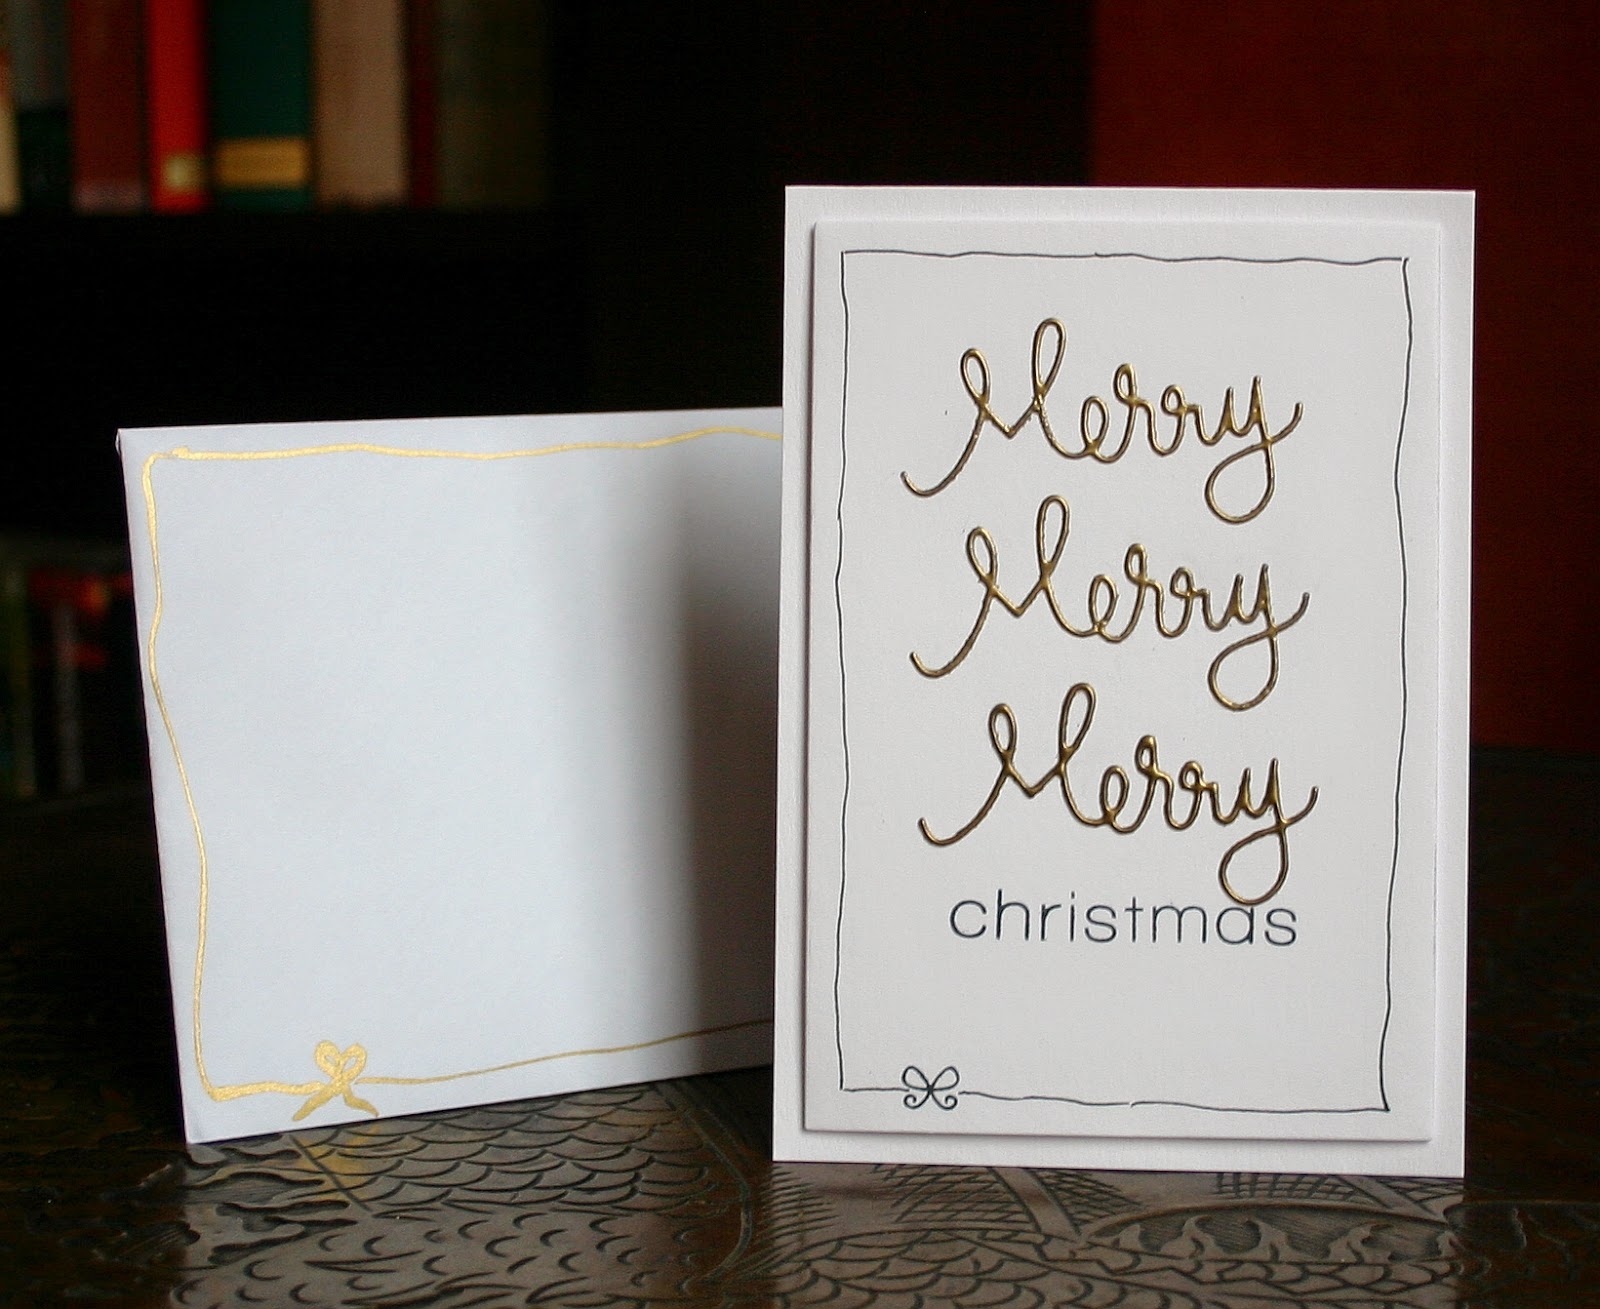
I also created a very simple Christmas card today. I die cut the words from white cardstock and embossed them in gold. Then I cut a panel slightly smaller than the cardbase from white cardstock and stamped the word Christmas in the lower third. I glued the embossed die cuts in place and doodled an uneven line all around the panel. The bow is stamped, I didn't trust myself to draw one after all the trouble with the word dies. They are so intricate...


At last I adhered the panel to the front of a top folding card with foam tape.

I had no great idea for a matching envelope, so I just doodled the same kind of frame. With gold marker instead of black, because I didn't want it to look like a sympathy card.


Have a great day
Ela


Challenges: 
clean&simple: #313 Sketch


Thursday, 20 November 2014

Christmas card in classic red, green and gold


Hello Everyone,

My powder sock is still missing, but I managed to create a card none the less.
 

I used the TAWS background check set to create the triangle and colored in a few of the circles with red and green alcohol markers. Then I stamped and heat embossed the sentiment. I also embossed a few more of these circles, but in the end I didn’t like that as much and covered them with a gold perl maker pen. This way the gold tones don’t match as perfectly anymore, but the dots are nicely domed.


Close up
I cut the panel down only a little, added a red ribbon with a bow for some interest and adhered the panel to a red card base.

Then I picked a red envelope and stamped the dots again and added a few more drops of gold.
Have a great day

Ela


Challenges:
Creative Friday. #115 Am laufenden Band
CAS on Sunday: #46 Ribbon and/or Twine
 CAS(E) this Sketch: #100 Sketch